Insights
Stripe Payment Integration for Developers: A Complete Guide

For most web stores and subscription products, use the Stripe Checkout Sessions API. It handles taxes, SCA/3D Secure authentication, subscription lifecycle, and duplicate-charge prevention without custom code on your end. Stripe hosts the payment page or embeds it in an iframe, which keeps sensitive card fields off your server and shrinks your PCI compliance burden to near zero.
Here is the decision in three lines:
- Checkout Sessions (hosted or embedded): The recommended default. Covers subscriptions, taxes, multi-currency, and SCA automatically. Less code, fewer edge cases.
- Elements + Payment Intents: Choose this when you need pixel-perfect UI control, unusual payment flows, or a checkout experience that cannot live inside a Stripe-hosted page.
- Payment Links: The no-code option. Paste a link into an email or social post and collect payments with zero development effort. Ideal for one-off sales or donation pages.
Key Takeaways
Stripe Checkout Sessions is the right default for most integrations because it handles taxes, SCA, subscriptions, and duplicate-charge prevention without custom code, while Elements and Payment Intents remain the correct choice only when full UI control is a genuine product requirement.
| Point | Details |
|---|---|
| Default integration choice | Use Checkout Sessions for most web stores, SaaS products, and subscription flows. |
| Security and PCI scope | Hosted or embedded Checkout keeps card data off your server and qualifies you for SAQ A. |
| Webhook reliability | Always verify signatures and use idempotency keys; never rely on redirect URLs for fulfillment. |
| Testing before launch | Use Stripe test cards and the Stripe CLI to simulate success, decline, and 3DS scenarios locally. |
| Quantum3 implementation | Quantum3 delivers end-to-end Stripe integrations, including webhook architecture and monitoring, typically in two to four weeks. |
Table of Contents
- Which Stripe payment integration fits your use case?
- How to implement Stripe Checkout Sessions step by step
- How to implement Elements and Payment Intents for a custom checkout
- Subscriptions and recurring billing with Stripe Billing
- What payment methods does Stripe support and how do you enable them?
- Security, PCI compliance, and SCA best practices
- Testing, common errors, and a debugging checklist
- Deployment, monitoring, and maintenance for a production integration
- How Quantum3 Studios implements Stripe integrations
- When to build the Stripe integration yourself vs. when to hire a partner
- Quantum3 Studios can handle your Stripe integration end to end
- Sources
Which Stripe payment integration fits your use case?
The right path depends on how much UI control you need versus how much maintenance you are willing to own. Stripe documents all integration paths from no-code Payment Links through to fully custom Elements flows, and positions Checkout Sessions as the low-maintenance, broad-feature default.
| Integration | Developer effort | Customization | Maintenance | Feature support | Hosting | PCI scope |
|---|---|---|---|---|---|---|
| Hosted Checkout (redirect) | Low | Low (logo, colors) | Low | Full (subs, tax, multi-currency) | Stripe-hosted | Minimal |
| Embedded Checkout (iframe) | Low–Medium | Medium (page stays yours) | Low | Full | Stripe-hosted iframe | Minimal |
| Elements + Payment Intents | High | Full | High | Manual (you wire tax, subs) | Your server | Moderate |
| Payment Links (no-code) | None | Very low | None | Basic | Stripe-hosted | Minimal |
Typical merchant scenarios:
- SaaS subscriptions: Hosted or embedded Checkout. Stripe Billing, proration, and invoice management are built in.
- Standard e-commerce: Hosted Checkout covers shipping, tax (via Stripe Tax), and multi-currency without extra code.
- Marketplace or split payments: Elements + Payment Intents with Stripe Connect gives you the routing control you need.
- Donation or one-off sales: Payment Links or hosted Checkout. No engineering time required.
Pro Tip: The biggest conversion gains usually come from wallet support (Apple Pay, Google Pay) and a clean mobile layout, not from custom UI. Hosted Checkout enables both out of the box. Before building a fully custom Elements flow for branding reasons, check whether embedded Checkout’s iframe approach gives you enough control. It often does, and it saves weeks of development.
For no-code payment acceptance, Payment Links are a practical starting point before you commit to a full API integration.
How to implement Stripe Checkout Sessions step by step

This is the path most teams should follow. The Stripe Checkout quickstart covers the full server-and-client flow; the steps below map it to a production-ready sequence.
1. Account setup and API keys
- Create a Stripe account and navigate to Developers > API keys in the Dashboard.
- Use your test secret key (
sk_test_...) and test publishable key (pk_test_...) during development. Switch to live keys only at launch. - Never expose your secret key client-side. Store it in an environment variable (
STRIPE_SECRET_KEY) and load it server-side only. - For restricted access, create a restricted key in the Dashboard with only the permissions your server needs (e.g.,
checkout.sessions:write,webhooks:read).
2. Install the server-side SDK
Install the official library for your stack:
- Node.js:
npm install stripe(stripe-node) - Python:
pip install stripe(stripe-python) - Ruby:
gem install stripe
3. Create a Checkout Session on the server
Your server creates the session and returns either a url (for redirect) or a client_secret (for embedded). A minimal Node.js example:
const stripe = require('stripe')(process.env.STRIPE_SECRET_KEY);

const session = await stripe.checkout.sessions.create({
  mode: 'payment',           // or 'subscription' or 'setup'
  line_items: [{ price: 'price_xxx', quantity: 1 }],
  success_url: 'https://yoursite.com/success?session_id={CHECKOUT_SESSION_ID}',
  cancel_url: 'https://yoursite.com/cancel',
});

res.json({ url: session.url });
For embedded Checkout, set ui_mode: 'embedded' and return session.client_secret instead of session.url. The embedded Checkout quickstart shows the full React + Node pattern.
Always pass an idempotency key on session creation to prevent duplicate charges when clients retry under flaky network conditions:
await stripe.checkout.sessions.create({ ... }, {
  idempotencyKey: `checkout-${userId}-${orderId}`,
});
4. Client-side redirect or embed
Redirect (hosted): After your server returns { url }, redirect the browser:
window.location.href = data.url;
Embedded: Load @stripe/stripe-js, initialize Stripe with your publishable key, then mount the embedded Checkout component using the client_secret your server returned. The iframe handles all card input securely.
5. Handle webhooks
Do not rely on the success_url redirect to confirm payment. Redirects can be interrupted. Use webhooks for reliable fulfillment.
Numbered setup steps:
- In the Dashboard, go to Developers > Webhooks and add your endpoint URL.
- Select the
checkout.session.completedevent (andcheckout.session.async_payment_succeededfor bank transfers). - Copy the signing secret (
whsec_...) and verify every incoming event:
const event = stripe.webhooks.constructEvent(
  req.rawBody,
  req.headers['stripe-signature'],
  process.env.STRIPE_WEBHOOK_SECRET
);
- In your handler, check
event.type === 'checkout.session.completed', then fulfill the order, save thecustomerID, and mark the session as processed using itsidas an idempotency guard. - Return a
200response immediately. Move slow tasks (email, provisioning) to a background queue.
6. Test the full cycle
- Run your server with test keys.
- Use Stripe’s test card
4242 4242 4242 4242(any future expiry, any CVC) for a successful payment. - Use
4000 0025 0000 3155to trigger a 3D Secure authentication challenge. - Use the Stripe CLI (
stripe listen --forward-to localhost:3000/webhook) to tunnel webhook events locally without ngrok. - Confirm your webhook handler fires, the order is fulfilled, and the session ID is logged.
How to implement Elements and Payment Intents for a custom checkout
Choose Elements when your design team needs full control over the checkout UI, or when your payment flow cannot fit inside a Stripe-hosted page. The tradeoff is real: you own more code, more styling, and more edge-case handling. Stripe’s Payments quickstart notes that Checkout Sessions with the Payment Element is often simpler than raw Payment Intents for many use cases, so confirm you genuinely need this path before starting.
When Elements makes sense
- You need a checkout experience that matches your design system precisely.
- You are building a mobile app with a native payment sheet.
- You are processing marketplace payments with Stripe Connect and need routing logic mid-flow.
Server: create a PaymentIntent
import stripe
stripe.api_key = os.environ['STRIPE_SECRET_KEY']

intent = stripe.PaymentIntent.create(
  amount=4999,
  currency='gbp',
  automatic_payment_methods={'enabled': True},
)
return jsonify(client_secret=intent.client_secret)
Return only the client_secret to the client. Never send the full PaymentIntent object.
Client: mount the Payment Element
Numbered steps:
- Install
@stripe/stripe-js:npm install @stripe/stripe-js. - Initialize Stripe:
const stripe = await loadStripe('pk_live_...'). - Create an Elements instance with the
client_secret:const elements = stripe.elements({ clientSecret }). - Mount the Payment Element:
elements.create('payment').mount('#payment-element'). - On form submit, call
stripe.confirmPayment({ elements, confirmParams: { return_url: '...' } }). - Handle the
authentication_requirednext action. Stripe surfaces the 3D Secure modal automatically whenconfirmPaymentis called.
Pro Tip: When saving a card for future use, set setup_future_usage: 'off_session' on the PaymentIntent. Stripe then optimizes the authentication flow so the customer authenticates once now and off-session charges later avoid unnecessary friction. Attach the resulting PaymentMethod to a Customer object and store the Customer ID server-side for future charges.
Saving cards and off-session charges
- Create a
Customerobject on first purchase and store the ID in your database. - Attach the PaymentMethod to the Customer after confirmation.
- For off-session charges (renewals, retries), create a new PaymentIntent with
customer,payment_method, andoff_session: true. If Stripe returnsauthentication_required, send the customer a re-authentication email with a link to a hosted invoice page.
SCA and 3D Secure
Payment Intents surfaces SCA challenges through the next_action field. When confirmPayment encounters a challenge, Stripe handles the modal on web automatically. On mobile, use Stripe’s iOS or Android SDK, which manages the authentication sheet natively. Always listen for payment_intent.payment_failed webhooks with error.code: authentication_required so you can notify the customer.
Subscriptions and recurring billing with Stripe Billing
Stripe Billing adds a product and price model on top of Payment Intents that makes recurring revenue far easier to manage than rolling your own subscription logic.
Core objects to understand:
- Product: What you sell (e.g., “Pro Plan”).
- Price: How you charge for it (e.g., £49/month, billed monthly). Prices can be recurring or one-time.
- Subscription: Links a Customer to a Price and manages the billing cycle, trial periods, and invoice generation automatically.
Saving payment details during Checkout:
Set payment_intent_data.setup_future_usage: 'off_session' on a Checkout Session (or use mode: 'subscription' directly) to save the payment method for future billing cycles. Stripe attaches it to the Customer automatically.
Key webhook events to consume:
invoice.created: Finalize the invoice before Stripe charges (useful for adding line items).invoice.payment_succeeded: Provision or extend access.invoice.payment_failed: Trigger dunning, send a payment-failure email.customer.subscription.updated: Detect plan changes, proration, or cancellation.
Common Billing gotchas:
- Proration: When a customer upgrades mid-cycle, Stripe prorates by default. Confirm your proration behavior in the Subscription’s
proration_behaviorfield. - Trial periods: Set
trial_period_dayson the Subscription. Stripe sendscustomer.subscription.trial_will_endthree days before the trial ends. - Automated retries and dunning: Configure Smart Retries in the Dashboard under Billing > Settings. Stripe retries failed invoices on an intelligent schedule and can send automated payment-failure emails.
- Invoice settings: Set
days_until_duefor manual payment invoices, or leave it unset for automatic collection.
What payment methods does Stripe support and how do you enable them?
Stripe Checkout supports more than 125 local payment methods and surfaces them dynamically based on the customer’s country and currency. You do not need to hard-code a list of methods.
Common categories developers enable:
- Cards: Visa, Mastercard, Amex, and others globally.
- Wallets: Apple Pay and Google Pay (enabled automatically in Checkout when the customer’s device and browser support them).
- Bank debits: ACH Direct Debit (US), BACS Direct Debit (UK), SEPA Direct Debit (EU).
- Bank transfers: ACH Credit Transfer, SEPA Credit Transfer.
- Buy now, pay later: Klarna, Afterpay/Clearpay.
- Local methods: iDEAL (Netherlands), Bancontact (Belgium), Przelewy24 (Poland), and others.
How to enable payment methods:
In the Dashboard, go to Settings > Payment methods and toggle methods on or off. For API-driven control, pass payment_method_types explicitly on the Checkout Session or PaymentIntent. Leaving it unset with automatic_payment_methods: { enabled: true } lets Stripe surface the best methods for each customer automatically.
What affects availability:
- Your Stripe account’s country and currency settings.
- The customer’s billing country and currency.
- Whether you have completed any required verification for specific methods (e.g., BACS requires UK business verification).
Pro Tip: For high-ticket B2B payments, ACH bank transfers carry a 0.8% fee capped at $5, which is materially cheaper than card processing rates. Surface bank transfer as an option for invoices above a threshold your margins can define. For consumer checkouts, prioritize Apple Pay and Google Pay. Research on wallet adoption consistently shows that one-tap checkout reduces cart abandonment, particularly on mobile. A practical guide to Apple Pay and Google Pay for small businesses covers the conversion case in detail.
Security, PCI compliance, and SCA best practices
PCI scope
Using Stripe-hosted Checkout (redirect or embedded iframe) keeps card data entirely on Stripe’s servers. Your application never touches raw card numbers, which qualifies you for SAQ A, the lightest PCI self-assessment questionnaire. Elements embeds fields inside your page via iframes, which still keeps raw card data off your server but requires slightly more diligence in your client-side code and qualifies you for SAQ A-EP in most cases.
SCA and 3D Secure
Strong Customer Authentication (SCA) is required for most card transactions in the UK and EU. Checkout Sessions handles SCA challenges automatically. With Payment Intents, your confirmPayment call triggers the 3D Secure modal when required. Never skip the next_action handling step.
API key hygiene
- Store secret keys in environment variables, never in source code or client-side bundles.
- Create restricted keys for specific server functions rather than using your full secret key everywhere.
- Rotate keys immediately if you suspect exposure. Stripe lets you roll keys in the Dashboard without downtime.
- Use your publishable key (
pk_...) only for client-side Stripe.js initialization.
Security checklist
- Serve all payment endpoints over HTTPS.
- Verify every webhook with
stripe.webhooks.constructEventand your signing secret. Reject events that fail verification. - Use idempotency keys on all server-side create calls to prevent duplicate charges.
- Log webhook event IDs and check for duplicates before processing (Stripe can deliver the same event more than once).
- Never log raw card data, full PANs, or CVCs. Stripe’s libraries handle this, but audit any custom logging middleware.
Testing, common errors, and a debugging checklist
Testing steps
- Confirm your server is using test keys (
sk_test_...,pk_test_...). Live keys and test keys are not interchangeable. - Use Stripe’s test card numbers for specific scenarios:
4242 4242 4242 4242: Successful payment.4000 0025 0000 3155: Requires 3D Secure authentication.4000 0000 0000 9995: Declined withinsufficient_funds.4000 0000 0000 0002: Genericcard_declined.
- Run the Stripe CLI locally:
stripe listen --forward-to localhost:3000/webhookto receive real webhook events in your dev environment. - Trigger specific events manually:
stripe trigger checkout.session.completed. - Confirm your webhook handler processes the event, returns
200, and completes fulfillment logic.
Common error codes and what they mean
authentication_required: The card issuer requires 3D Secure. Surface a re-authentication prompt.card_declined: Generic decline. Ask the customer to try a different card.insufficient_funds: Decline due to balance. Same user-facing message as above.incorrect_cvc: CVC mismatch. Prompt the customer to recheck the security code.rate_limit: Too many API requests. Implement exponential backoff on retries.
Debugging checklist
- Check Developers > Webhooks in the Dashboard for delivery logs and HTTP response codes from your endpoint.
- Use Developers > Events to replay any event to your endpoint without re-triggering a real charge.
- Verify your signing secret matches the one in your environment variable exactly.
- Check server logs for the raw
stripe-signatureheader ifconstructEventthrows. - For user-facing errors, show a generic “payment failed” message with a retry prompt. Log the full error code and PaymentIntent ID server-side for investigation.
Deployment, monitoring, and maintenance for a production integration
Launch checklist
- Replace all test keys with live keys in your production environment variables.
- Update your webhook endpoint URL in the Dashboard to your production domain and copy the new signing secret.
- Verify your
success_urlandcancel_url(orreturn_urlfor embedded) resolve correctly in production. - Confirm HTTPS is active on all payment-related routes.
- Set up a Stripe Dashboard alert for payment success rate drops under Developers > Alerts.
Monitoring tips
Track these metrics from day one:
- Payment success rate: A drop below your baseline is the first signal of a broken flow or a card issuer issue.
- Failed payment reasons: Segment by error code to distinguish user errors (wrong CVC) from systemic issues (rate limits, webhook failures).
- Refund and chargeback rates: High chargeback rates can trigger Stripe account reviews.
- API latency: Monitor your server-side session creation time. Slow responses increase cart abandonment.
Pair Stripe’s Dashboard data with server-side event tracking to get a complete picture of where customers drop off between checkout initiation and payment confirmation. For broader payment analytics alongside other conversion metrics, analytics alternatives to Google Analytics can give you more granular funnel data without sampling.
Maintenance items
- Update your Stripe SDK regularly. Breaking changes are rare, but Stripe deprecates older API versions on a published schedule.
- Review Settings > Payment methods quarterly. Stripe adds new local methods frequently, and enabling them takes minutes.
- Audit webhook handlers annually: confirm idempotency logic is still correct, handlers are not silently failing, and event types you subscribed to still match your fulfillment logic.
- Review your website maintenance plan to include Stripe SDK updates and webhook endpoint health checks as recurring tasks.
How Quantum3 Studios implements Stripe integrations
Quantum3 approaches every Stripe integration as a product delivery, not a configuration task. The process starts with a discovery session to map your business model (one-time, subscription, marketplace) to the right integration type, then moves through design review, development sprints, QA against Stripe’s test card suite, and a structured launch checklist.
What clients receive:
- A working Checkout Sessions or Elements integration matched to their use case, with server-side session creation, webhook handlers, and idempotency logic built in from day one.
- Webhook handler coverage for the full payment lifecycle: fulfillment, subscription events, failed payment retries, and refund processing.
- A monitoring dashboard hookup so payment success rates, failed payment reasons, and chargeback rates are visible from launch.
- Written documentation and a handover session covering API key rotation, webhook management, and how to enable new payment methods in the Dashboard.
Typical engagement scope:
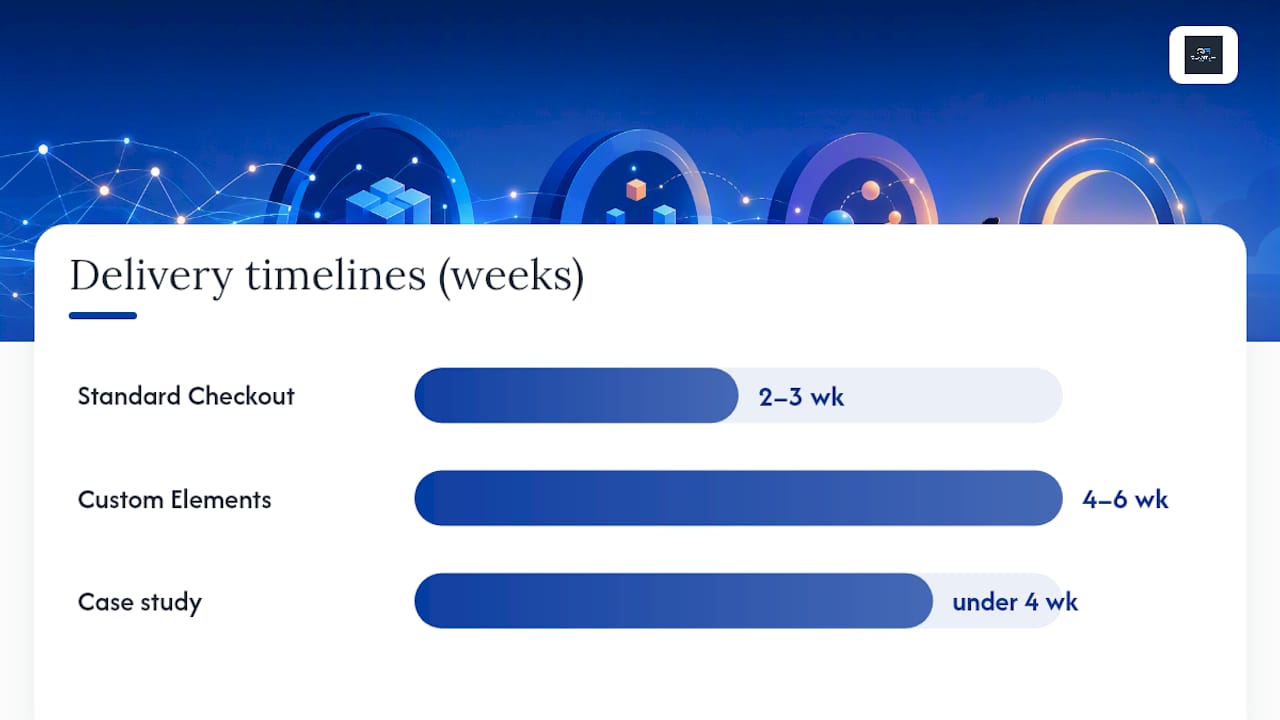
- Standard e-commerce or SaaS Checkout integration: 2–3 week delivery for a hosted or embedded Checkout Sessions setup with webhook handling and basic monitoring.
- Custom Elements integration with subscriptions: 4–6 weeks, including Stripe Billing configuration, dunning setup, and off-session charge handling.
- Ongoing support retainer: Monthly SDK updates, webhook audits, and payment method reviews.
Quantum3 delivered a complete Stripe Billing integration with subscription management, proration handling, and a real-time payment dashboard in under four weeks. The webhook architecture they built has processed thousands of subscription events without a single missed fulfillment.
For teams building e-commerce conversion optimization into their payment flow, Quantum3 also covers post-payment UX: success pages, upsell flows, and return-URL analytics.
When to build the Stripe integration yourself vs. when to hire a partner
The honest answer depends on four variables: developer bandwidth, UI requirements, compliance complexity, and time-to-market.
DIY is a reasonable choice when:
- You have a developer (or are one) with at least one prior API integration under their belt.
- Your use case is standard: hosted Checkout, a single currency, no subscriptions.
- You have time to work through Stripe’s documentation and test edge cases properly.
- Your compliance posture is simple (SAQ A, no stored card data, no marketplace flows).
Hiring a partner makes more sense when:
- Your team has no developer bandwidth available in the next 4–8 weeks.
- Your integration involves subscriptions, proration, multi-currency, or Stripe Connect for marketplace payouts.
- You are operating in a regulated environment (financial services, healthcare payments) where webhook reliability and audit trails matter.
- You need a fast launch and cannot afford the iteration time that comes with learning a new payments API.
The risk that most teams underestimate is not the initial build. It is the maintenance surface: webhook handlers that silently fail, SDK versions that drift, and payment method settings that never get reviewed. A well-structured handover from an experienced integration partner reduces that ongoing risk substantially, and the documentation alone tends to pay for itself the first time a developer leaves the team.
Quantum3 Studios can handle your Stripe integration end to end
Stripe’s API is well-documented, but a production-grade integration covers more ground than most teams anticipate: webhook reliability, idempotency, SCA handling, subscription lifecycle, and ongoing maintenance. Quantum3 delivers complete Stripe payment integrations, from initial Checkout Sessions setup through to Stripe Billing, webhook architecture, and a monitoring dashboard, typically within two to four weeks for a standard engagement.

If you are evaluating agency support, here is what Quantum3 needs to scope your project:
- Your business model (one-time payments, subscriptions, marketplace, or a mix).
- Your existing tech stack (Node.js, Python, Ruby, a platform like Shopify or WooCommerce).
- Your target launch date and any compliance requirements.
Quantum3 also offers AI integrations and automation that pair naturally with a Stripe setup, including automated payment confirmation workflows, CRM sync on successful checkout, and AI voice agent follow-ups for failed payments. To get a project scoped and a quote, submit an enquiry and a member of the team will respond within one business day.
Sources
The references below are the primary Stripe documentation pages used throughout this guide:
Recommended
Want this for your business?
Tell us what you have in mind. A quick conversation is all it takes to scope it out.