Insights
Offline Conversion Import: Migrate to Enhanced Conversions in 2026

For most advertisers, the right path is clear: enable enhanced conversions for leads, connect your CRM through Data Manager, and stop relying on GCLID-only uploads as your primary measurement method. Starting June 15, 2026, offline conversion imports via the legacy Google Ads API will be blocked, and only Data Manager API connections will be accepted for new uploads. That deadline is not a soft recommendation. It is a hard cutoff.
Three actions to take right now:
- Confirm your Google tag or Google Tag Manager setup captures user-provided data (email, phone) on lead forms, or enable enhanced conversions for leads in your Google Ads account settings.
- Prepare hashed PII using SHA-256 normalization before any upload. Raw email addresses or phone numbers will be rejected.
- Choose your upload method (Data Manager UI, SFTP, or API) and schedule uploads within the allowed windows: 90 days from last click for traditional GCLID-based imports, and 63 days for enhanced conversions for leads.
GCLID-based imports remain supported during the migration period and still make sense for specific use cases, particularly when your CRM reliably captures click IDs at the moment of form submission. But enhanced conversions for leads are the more durable default going forward.
Key Takeaways
Enhanced conversions for leads with Data Manager API is the most durable, privacy-resilient path for offline conversion import in 2026, requiring SHA-256-hashed PII, uploads within 63 days, and a confirmed Google tag or GTM setup.
| Point | Details |
|---|---|
| Migrate before June 15, 2026 | Legacy Google Ads API uploads will be blocked; switch to Data Manager API or UI uploads now. |
| Hash and normalize first | Lowercase, trim, and format all PII before SHA-256 hashing to maximize match rates. |
| Respect upload time windows | GCLID imports must arrive within 90 days; enhanced conversions for leads within 63 days. |
| Verify with diagnostics | Use the Enhanced Conversions diagnostics report and upload history logs before scaling automation. |
| Quantum3 for implementation | Quantum3 handles GTM setup, server-side hashing, CRM-to-Data Manager integrations, and diagnostics monitoring end to end. |
Table of Contents
- How does offline conversion import actually work?
- When should you use enhanced conversions vs GCLID imports?
- How do you set up offline conversion tracking step by step?
- What upload methods and file formats does Google accept?
- How do you troubleshoot upload errors and verify matches?
- What are the best practices for privacy and security?
- Why the conventional wisdom on offline attribution gets it wrong
- Quantum3 can handle your Data Manager migration and CRM integration
- Useful sources and official documentation
How does offline conversion import actually work?
Every offline conversion import relies on matching a conversion event in your CRM to an ad interaction in Google’s system. The matching mechanism differs by method, and understanding those differences determines which approach fits your setup.
GCLID-based imports work by capturing the Google Click ID appended to a landing page URL when a user clicks your ad. You store that GCLID in your CRM alongside the lead record, then upload it back to Google Ads with a conversion timestamp and value. Google matches the GCLID to the original click record.
Enhanced conversions for leads takes a different approach. Instead of relying on a click token, your tag captures user-provided data (email address, phone number, name) at the moment of form submission. That data is normalized and hashed with SHA-256 on your server or via the Google tag, then uploaded to Google. Google matches the hashed identifiers against signed-in Google Account data, which enables cross-device attribution and is more resilient to browser privacy restrictions.
Call and conversation imports use a third path: call duration or call outcome data from a call tracking provider, matched to a Google forwarding number or call extension click.
Matching quality drives bidding performance. When Google can match an uploaded conversion to a signed-in user account, Smart Bidding receives a cleaner signal about which ad interactions actually produce revenue. Higher match rates translate directly into more accurate Target CPA and Target ROAS optimization. Enhanced conversions for leads consistently produces stronger match rates than GCLID-only imports because first-party identity data is more durable than a session-level click token.
The data flow looks like this: a user clicks your ad → lands on your site → submits a form (GCLID captured in a hidden field, or email/phone captured by the Google tag) → lead enters your CRM → your team closes the deal → CRM exports the conversion record → you upload hashed data to Google → Google matches and attributes the conversion to the original campaign.
Advertisers who paired first-party data (email, phone) with imported GCLIDs saw a median 10% increase in conversions compared to standard offline conversion imports alone. That figure reflects the matching advantage of identity-based attribution.
When should you use enhanced conversions vs GCLID imports?
Enhanced conversions for leads is the preferred default for most lead-generation advertisers. GCLID imports remain the right choice when your CRM reliably captures click IDs and your sales process does not involve significant cross-device activity.
Choose enhanced conversions for leads when:
- Your CRM stores email addresses or phone numbers for every lead
- Your sales cycle spans multiple days or weeks (cross-device activity is likely)
- You operate in a privacy-conscious environment and want a method that survives third-party cookie deprecation
- You have consent to collect and process user-provided data under your privacy policy
- You want a single unified setting (Google is merging enhanced conversions for web and for leads into one on/off toggle starting April 2026)
Stick with GCLID-based imports when:
- Your CRM captures the GCLID reliably at form submission and stores it persistently
- Your sales process is primarily phone-driven and you cannot collect email at the point of ad click
- You need to attribute in-person or offline sales where no digital identifier is available at the time of conversion
| Dimension | GCLID-based import | Enhanced conversions for leads |
|---|---|---|
| Identifier type | Click token (URL parameter) | Hashed first-party PII (email, phone) |
| Match durability | Fragile under privacy restrictions | Resilient; tied to signed-in Google Account |
| Cross-device attribution | Limited | Supported |
| Implementation complexity | Moderate (hidden field + CRM storage) | Moderate (Google tag or GTM + hashing) |
| Upload time limit | 90 days from last click | 63 days from last click |
| Best for | Phone-driven sales, in-person closes | Long sales cycles, digital lead forms |
For businesses with longer sales cycles or phone-driven closes, the ability to import closed-deal data weeks after the original click is what makes either method worth the implementation effort, as explained in this comprehensive Shopify Conversion Rate Optimization guide. Without it, Smart Bidding optimizes toward form fills, not revenue.
How do you set up offline conversion tracking step by step?
Create the conversion action in Google Ads
Start in your Google Ads account under Tools > Conversions > New conversion action. Select “Import” as the source, then choose “CRM, files, or other data sources.” Set the conversion category (Lead, Purchase, or other), assign a value if known, and set the counting method. For lead-gen, “One” per click is standard. Wait 4–6 hours after creating the action before attempting your first upload.
Capture identifiers on your website
For GCLID capture, auto-tagging must be enabled in your Google Ads account settings. Add a hidden form field named gclid and populate it via JavaScript that reads the gclid URL parameter on page load. Store the value in localStorage as a fallback for multi-page form flows. Your CRM must record this value alongside every lead submission.
For enhanced conversions, your Google tag or GTM setup captures the email address, phone number, and name fields at form submission. No hidden field is needed; the tag reads the form DOM directly.
Configure GTM for enhanced conversions
- Install the Conversion Linker tag on all pages (fires on all page views).
- Create a User-Provided Data event tag in GTM, mapped to your Google Ads conversion action.
- Set up DOM variables to pull
email,phone_number,first_name, andlast_namefrom your form fields. - Create a Form Submission trigger scoped to your lead form.
- Use GTM Preview mode to verify the tag fires and the variables populate correctly before publishing. GTM implementation guidance from practitioners recommends testing with a real form submission before going live.
Map and store identifiers in your CRM
Add custom fields to your CRM lead object: gclid (text, 100 chars), conversion_time (datetime, UTC), and conversion_value (decimal). For enhanced conversions, store the raw email and phone at capture time. Hash them server-side immediately before export. Never store pre-hashed values as your only copy; you need the raw data for CRM operations and re-hashing if format requirements change.
Account permissions checklist:
- Google Ads account has auto-tagging enabled
- Conversion action is set to “Import” type
- If using MCC, the manager account has the correct access level
- Developer token is active and has sent at least one request between January 2026 and June 2026 to remain allowlisted for legacy API access
What upload methods and file formats does Google accept?
Upload methods compared
Manual CSV upload works through the Google Ads UI under Conversions > Upload. Best for low-volume, infrequent imports or initial testing. No automation required.
SFTP automated uploads let you drop a formatted CSV to a Google-hosted SFTP endpoint on a schedule. Name files with a consistent prefix and timestamp (e.g., conversions_20260601_0800.csv). Google processes files within a few hours of receipt. Useful for daily batch exports from a CRM.
Data Manager is the recommended path post-June 2026. Connect your CRM or data source directly through the Data Manager UI, map fields once, and let Google pull data on a schedule. Supports both GCLID and user-provided data imports.
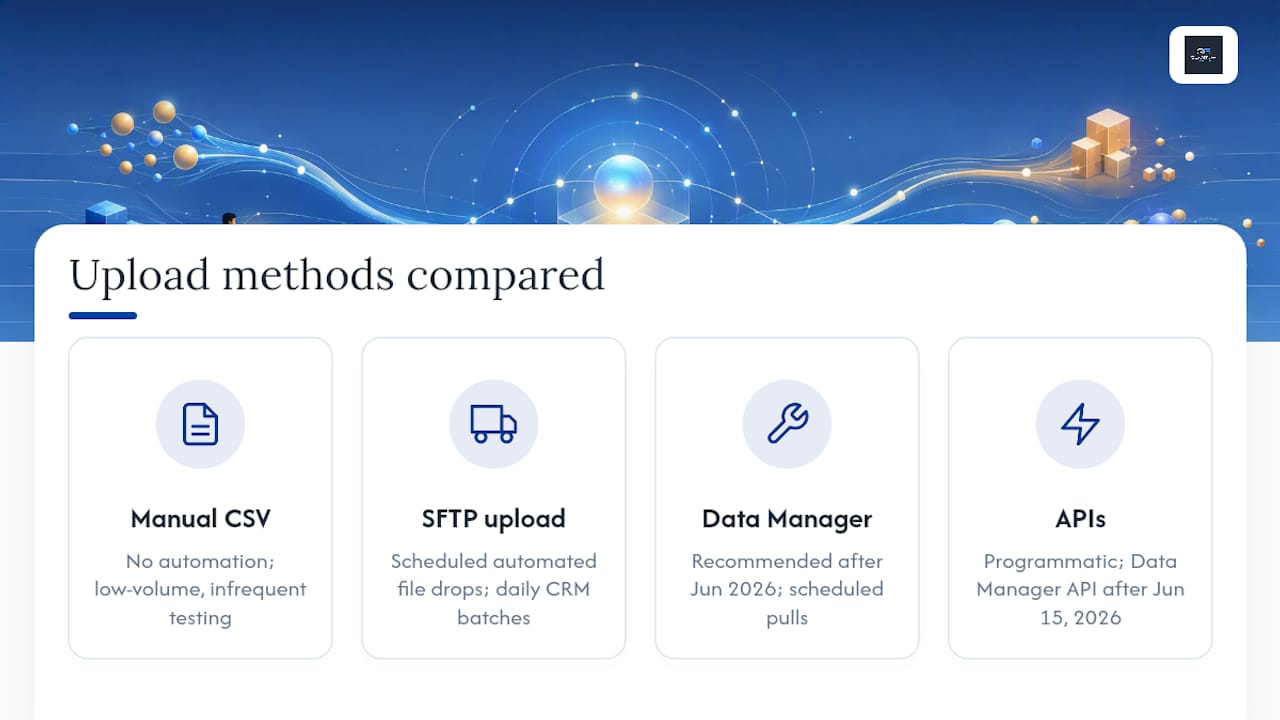
Google Ads API / Data Manager API is the programmatic route. After June 15, 2026, new offline conversion uploads must use the Data Manager API; the legacy Google Ads API upload endpoint will be blocked for accounts that have not maintained active developer token usage.
CSV template structure
For GCLID-based imports, the required columns are:
| Column | Format | Example |
|---|---|---|
Google Click ID |
String, case-sensitive | EAIaIQobChMI... |
Conversion Name |
Exact match to action name | Closed Deal |
Conversion Time |
yyyy-MM-dd HH:mm:ss timezone |
2026-06-15 00:00:00 UTC |
Conversion Value |
Decimal | — |
Conversion Currency |
ISO | USD |
For enhanced conversions for leads, replace the GCLID column with hashed user-provided fields: Hashed Email, Hashed Phone Number, Hashed First Name, Hashed Last Name.
Pro Tip: Always include a header row exactly matching Google’s expected column names. A single typo in a column header causes the entire file to fail, not just the affected rows.
Batch uploads via the Google Ads API require populating ClickConversion objects and setting partial_failure=true so individual row errors surface without rejecting the entire batch.
How do you troubleshoot upload errors and verify matches?
Diagnostics workflow
- Run a small test batch (10–20 rows) before automating full-volume uploads.
- Set
partial_failure=trueon API uploads to surface row-level errors without rejecting the entire batch. - Check the Enhanced Conversions diagnostics report in Google Ads (Conversions > Diagnostics) for issues with missing or incorrectly formatted user-provided data.
- Review the import results log in the Google Ads UI (Conversions > Upload history) for file-level status and row-level error counts.
- After a successful upload, allow approximately 3 hours for conversions to appear in reporting columns.
Verifying match-rate improvements
View imported conversions under Segment > Conversion action in the Campaigns report. Use the All conv. (by conv. time) column to see conversions attributed by the time the offline event occurred, not the click date. To measure the impact of a method upgrade, run a 2–4 week baseline period with your old method, then switch and compare match rates and attributed conversion volume by conversion action.
What are the best practices for privacy and security?
Only upload the minimum identifiers needed to achieve a match. If email alone produces an acceptable match rate, there is no reason to also upload phone, name, and address. Collecting and transmitting more PII than necessary increases your exposure under U.S. state privacy laws, including the California Consumer Privacy Act and similar frameworks in Colorado, Virginia, and Connecticut.
Security checklist:
- Hash all PII server-side before it leaves your environment
- Transmit files over SFTP with TLS encryption or use the Data Manager API over HTTPS
- Restrict access to raw PII exports to the minimum number of team members who need it
- Log every upload with a timestamp, file name, and row count for audit purposes
- Rotate API credentials and SFTP keys on a regular schedule
- Do not store hashed values as a substitute for raw data; keep raw data in your CRM under your standard retention policy
U.S. privacy considerations:
Update your privacy policy to disclose that you share hashed user data with advertising platforms for conversion measurement. Honor opt-out requests by suppressing those users from future upload batches. Set a data retention schedule for conversion records; most advertisers align this with their CRM retention policy (typically 12–24 months). This article provides general operational guidance, not legal advice. Confirm your specific obligations with a qualified privacy attorney.
Operational best practices:
- Define a conversion window policy and document it (e.g., “we upload closed deals within 30 days of the form submission date”)
- Deduplicate records before every upload using a unique conversion ID field
- Monitor match-rate trends weekly; a sudden drop usually signals a tagging or normalization change upstream
- Schedule uploads at consistent intervals (daily or weekly) rather than ad hoc batches
Why the conventional wisdom on offline attribution gets it wrong
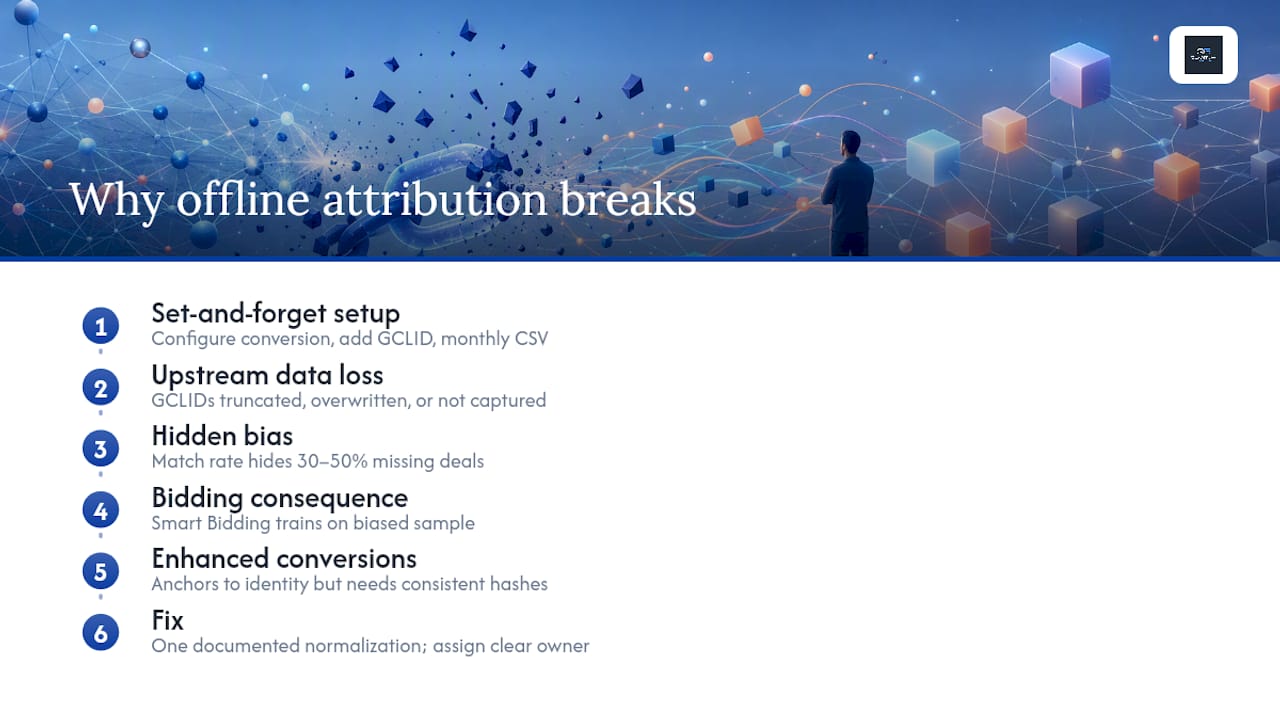
Most guides treat offline conversion tracking as a “set it and forget it” task. Configure the conversion action, drop a hidden GCLID field on your form, upload a CSV once a month, and call it done. That approach was barely adequate three years ago. In 2026, it is actively misleading your bidding algorithms.
The real problem is not the upload mechanics. It is the data quality upstream. A GCLID stored incorrectly in a CRM (truncated, overwritten by a second visit, or simply never captured because auto-tagging was off for a campaign) produces a match rate that looks fine in aggregate but is actually missing 30–50% of your closed deals. Smart Bidding then optimizes toward the leads that happen to have clean GCLIDs, not the leads that actually close. You end up with a bidding model trained on a biased sample.
Enhanced conversions for leads solves part of this by anchoring to identity rather than session tokens. But it introduces its own failure mode: teams that implement the Google tag correctly but normalize email addresses inconsistently across their CRM, their upload script, and their tag configuration. Three slightly different normalization rules produce three different hashes for the same person. None of them match.
The fix is not more tooling. It is a single, documented normalization function applied consistently at every point where user data is written or exported. That sounds obvious. Most teams skip it because no one owns the intersection between marketing ops and engineering. That ownership gap is where offline attribution breaks down in practice, and it is exactly where an implementation partner adds the most value.
Quantum3 can handle your Data Manager migration and CRM integration
Getting offline conversion imports right requires more than reading documentation. The gap between a working CSV upload and a fully automated, match-rate-optimized pipeline involves GTM configuration, server-side hashing logic, CRM field mapping, SFTP or API automation, and ongoing diagnostics monitoring. That is a cross-functional project, and most marketing teams do not have the engineering bandwidth to own all of it.

Quantum3 delivers end-to-end implementation: Google tag and GTM setup for user-provided data capture, server-side SHA-256 hashing pipelines, CRM-to-Data Manager integrations with automated upload scheduling, and a one-month diagnostics report confirming match rates and conversion attribution. Every engagement includes a documented implementation checklist and a hashed-data pipeline your team can maintain or hand back to us for ongoing support.
If your sales cycle runs weeks or months, your CRM is a legacy system, or you are managing uploads across multiple Google Ads accounts, the complexity compounds quickly. Quantum3’s project timelines are realistic: discovery and audit in 1–2 days, tagging and CRM mapping in 1–2 weeks, hash and upload automation in 1–3 weeks, then ongoing diagnostics. You get high-converting landing pages and lead capture forms built to capture identifiers correctly from day one, not retrofitted after the fact.
Ready to migrate before the June 15, 2026 deadline? Send Quantum3 your project details and get a scoped implementation plan within 48 hours.
Useful sources and official documentation
The following official resources cover the technical requirements and migration details referenced throughout this article:
- About offline conversion imports - Google Ads Help
- Manage offline conversions | Google Ads API
- Guidelines for importing offline conversions - Google Ads Help
- Set up offline conversions using Google Click ID (GCLID)
- How Offline Conversion Tracking Works with Google Ads (2025) - Shopify
- Offline Conversion Tracking: The True Attribution Of Google Ads
Check the Data Manager migration page and the Enhanced Conversions diagnostics report regularly, as Google continues to update platform requirements ahead of and after the June 2026 cutover.
Recommended
Want this for your business?
Tell us what you have in mind. A quick conversation is all it takes to scope it out.